SHEARING


SHEARING:

“Shearing” is a cutting process to remove protruding fibers on the surface of fabric.

SHEARING PROCESS STAGES


1.     Brushing of cloth.
2.     Cutting of projecting fibers.
3.     Suction of fiber removed by shearing.

SHEARING MACHINE PARTS & WORKING


1.     Outer casing which cover the machine assembly.
2.     A guide roller which just facilitates the movement of fabric.
3.     Two brushing rollers, first is in opposite to the direction is which the fabric move and second is in the same direction of the fabric. They are use to remove any type of hanging extra materials which can disturbance in process of shearing.
4.     Shearing Machine Parts & their function
5.     An adjustable bed- plate provides a base support for shearing action between the bed plate and cutting plate.
6.     A cutting roller with bladed mounted on it in spiral form which provide extra length of cutting blades from one end to the other  and make sure the contact between the blades and fabric in whole one revolution. Which increase the shearing rate projecting fibers as in a straight blade plate length is less then the spiral blade. Setting of blade require be accurate for a clear cut finish.
7.     A fan after cutting blades used for the removal of the removed projecting fibers.

MACHINE USED FOR SHEARING

            
Shearing machine is used for shearing.

AMOUNT OF SHEARING DEPENDS

1.     The amount of projecting fibers.
2.     Length of the projecting fibers.
3.     Speed of bladed roller. (40 meters/min)
4.     Setting between Blade roller to Bed.
5.     Sharpness of the bladed roller


De-sizing Process and its types

De-sizing Process
A process carried out to remove the sizing material (like starch) from the cloth. 

Objective of De-sizing

             1.     To eliminate the water repellent nature of sized cloth.             
             2.     To increase the absorbency.             
             3.     To reduce the consumption of chemicals in subsequent process.

Importance of De-sizing

                The importance of de-sizing is mainly because of water repellent nature of “Sizing materials”. So, it is important to remove the size material before conducting any  coloration or finishing process.

Enzymatic desizing


What are enzymes?

Name
·         Greek, meaning “In Yeast”

Nature
·         Bio-catalyst (proteins)

Structure
·         Usually large & complicated

Properties
·         Specific action
·         Thermo ability
·         Low energy of activation
·         Narrow working pH arrange

Classification
·         According to origin
·         According to action
·         According to structure
·         According to working temperature
Sources of Amylases
·         Malt
·         Bacteria
·         Pancreas

Requirements of desizing:
        • Desizing materials
        • Desizing methods
        • Desizing machine
Desizing processes
Desizing, irrespective of what the desizing agent is, involves impregnation of the fabric with the desizing agent, allowing the desizing agent to degrade or solubilise the size material, and finally to wash out the degradation products. The major desizing processes are:
  • Enzymatic desizing of starches on cotton fabrics
  • Oxidative desizing
  • Acid desizing
  • Removal of water-soluble size

Enzymatic desizing
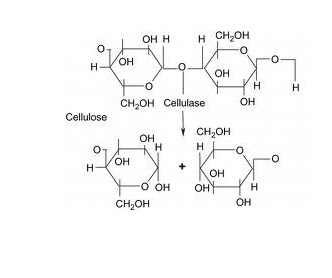
Enzymatic desizing is the most widely used desizing process of degrading starch size on cotton fabrics using enzymes. Enzymes are complex organic, soluble bio-catalysts, formed by living organisms that catalyze chemical reaction in biological processes. Enzymes are quite specific in their action on a particular substance. A small quantity of enzyme is able to decompose a large quantity of the substance it acts upon..
Amylases is the enzyme that hydrolyses and reduce the molecular weight of amylose and amylopectin molecules in starch, making it water soluble enough to be washed off the fabric.
Effect of PH and Temperature on enzyme desizing
Effective enzymatic desizing require strict control of pH, temperature, water hardness and electrolyte addition Activity of enzymes increase with temperature; however, above a critical temperature, enzymes are deactivated. The effectiveness of enzymes exhibit a maximum at certain temperatures, usually 40 -75 0C. Bacterial enzymes are the most thermally stable and can be used up to 100 0C under special stabilizing conditions. Certain salts increase the activity of specific enzymes. Pancreatic amylase is ineffective without the addition of salt. A combination of sodium chloride
Exhaust Process
                           Enzyme                    4 g/l
                            NaCl                        4 g/l
                           Wetting Agent         1 g/l
            Continuous Process


1. Saturate fabric with a solution containing:

Bacterial Amylase 0.8 - 1.0 %
Wetting agent 0.1 - 0.2 %
Sodium Chloride 10 %

2. Hold:

Open-width Range: Steam 1 to 2 minutes at 200 to 212 0F.
Rope Range: Store in J Box for 20 to 30 minutes at 170 to 180 0F. or
over night at room temperature.
3. Thoroughly rinse with hot water, 175 0F or hotter.

           
Oxidative desizing
In oxidative desizing, the risk of damage to the cellulose fiber is very high, and its use for desizing is very rare. Oxidative desizing uses potassium or sodium persulfate or sodium bromite as an oxidizing agent.
Acid desizing
Cold solutions of dilute sulphuric or hydrochloric acids are used to hydrolyze the starch, however, this has the disadvantage of damaging  cellulose fiber in cotton fabrics.
Removal of water-soluble sizes
Fabrics containing water soluble sizes can be desized by washing using hot water, perhaps containing wetting agents (surfactants) and a mild alkali. The water replaces the size on the outer surface of the fiber, and absorbs within the fiber to remove any fabric residue.
Assessment of size removal:
A drop of iodine solution placed on a test specimen resulting in a characteristic blue color is the universal test for identifying starch. It can be used as a qualitatively test to show whether all the starch was removed. Absence of the blue color signifiesthat all the starch has been removed. The intensity of the color is some what related to how much is left. Usually, if the color is faintly perceptible, the remaining starch will come out in the scouring and bleaching steps that follow.


SINGEING and its types


SINGEING:
Singeing    
The process of removal of protuding fibers from the surface of gray fabric by burning is called singeing.
OBJECTIVES OF SINGEING
Objectives of Singeing of  Woven Fabrics
Ø  Surface hairs helps to entrap air in the fabric when immersed in water it takes longer for water to enter the fabric since it must first displace the air .Singeing therefore helps to increase fabric wet ability.
Ø  It create a smooth surface for printing. It may be possible to print fine details on the Hairy surface but once the hairs moves again after printing and fine details  becomes fuzzy.
Ø  To emphases the woven Structure of the fabric if that is considered desirable.
Ø  To prevent a frosty appearance after dyeing. The projecting Dyed Hairs give the Fabric Surface The appearance of being poor   then rest the body of the fabric
Ø  To prevent or minimize the tendency of blend of Fabrics to form Pills. Pills  are the little Bolls of the Fibre that arise on the surface of some fabrics as a result of abrasion that occur during Usage.

Machines for singeing:
  •   Rotary cylinder singeing machine
  •   Plate singeing machine
  •  Flame singeing    

PLATE SINGING MACHINES OPERATIONS


1.     In plate singeing the fabric is pass over one or two curved plates of cupper with size 1”-2” thickness.
2.     Guide rollers are used to ensure the enough contact of cloth with the plate surface so that the projecting fibers are removed without any damage.
3.     Two levers are used to move the plates up and down depends upon the life of the plate.

PARAMETRES OF SINGEING MAHINES


1.     The plates are heated up to 150 °C.
2.     Speed of the cloth is 135 to 225 meters per minute.

ROLLER SINGEINGE MACHINE OPERATIONS


1.     In roller singeing machine fabric is passed over a hallow cylinder of cupper or cast iron cylinder which is heated by internal firing.
2.     The cylinder revolves slowly opposite to fabric direction.
3.     The face and back surface of the fabric may be singed in single passage by using two rollers.
Parameters of Flame singeing Machine:
         1.      Composition of flam
*      1 part LPG (liquid petroleum gas)
*      2 parts Air
         2.      Nature of flame
*      Use oxidizing flame because it produces minimum amount of ash
*      Temperature of the flame is about 1300°C

Zones of Singeing Machine .
Ø There are five zones of singeing Machine
Ø Entrance Zone
Ø Brushing Zone
Ø Singeing Zone
Ø Washing Zone

         3.      Distance of flame from fabric surface should be 1.5 to 4 mm.
         4.      Speed of the fabric
·         Speed of the fabric depends upon quality of the fabric
·         Speed of low quality fabric should be 120 meter per minute.
·         Speed of High quality fabric should be 60 to 80 meter per minute.

          5.      Angle of the flame
· Perpendicular to fabric structure(for heavy weight fabric)
· Tangential to fabric structure(for light weight fabric)


Inspection of gray fabric


Inspection of gray fabric:
            The process of observing and locating different types of faults in gray fabric is known as inspection of gray fabric.
Types of faults in the gray fabric:

  • v  Broken picks
  • v  Broken ends
  • v  Cut weft (pinhole in fabric due to cut r breakage of pick)
  • v  Neps, peels, and cracks
  • v  Missing of interlacement of pick and end
  • v  Yarn contamination
  • v  Floating or protruding fibers
  • v  Hang Pick( a pick is out of line for short distance creating hole cavity)
  • v  Wrong Drawing (wrong order of drawing ends through heals and reeds


  Four Point inspection system of fabric:
           The 4-Point System assigns 1, 2, 3 and 4 penalty points according to the size and significance of the defect. Points are assigned according to the following criteria:

                           
Penalty Point
Defects in Warp Except Holes Torn
1
Up to 3²
2
From1²to 6²
3
From 1²to 9²
4
From1² to 36²

Cutting Faults

Hole and Tear ¼ and over Heavy Crack and Float

Penalty points grading:
The following fabric penalty point grading standards are to be used during inspection.
  1. No more than 4 penalty points may be assigned for any single defect.
  2. No more than 4 penalty points may be assigned to one linear meter, regardless of the number of defects with in that one meter.
  3. A continuous defect shall be assigned 4 points for each meter in which it occurs.
  4. Any roll having a running defect through more than three continuous meters shall be rejected regardless of points count.
  5. No roll shall be accepted that contains a full width defect in the first or last three meters.
  6. A hole or torn is considered to be a major defect and shall be penalized 4 points.

No roll shall be accepted as first quality that exhibits a noticeable degree of looseness of tightness or ripples, puckers, folds or creases in the body of the fabric

Major & minor Penalty Points

           
Average Point: Average point is calculated by following formula.
                                                                                (Total Points) X (3937)
Total Average Points=
Per 100 Meter2                                               (Total length in Meters) X (Width)

                                                                              (Total Points) X 3600
Total Average Points =
Per 100 Yards2                                              (Total length in Meters) X (Width)


  • Ø According to SOP (Standard operating Procedure) if there are 15 faults in 100 square meter then the fabric is acceptable for further processes.
  • Ø If the faults are in between 15-18 then we correspond with the customer for its requirement. Customer decides whether it is acceptable or not.
  • Ø If total faults in 100 sq meter are more than 18 then the fabric is rejected.

Pretreatment

What is Pretreatment?
                   Textile Pre-treatment, considered to be a series of cleaning operations starting from the raw state of fiber, and lays the foundation for the quality in textile processing.

Importance of Pretreatment

                   Pre-treatment have same importance as coloration and finishing of textile materials, about 60%-70% faults that appears in processing unit are due to inadequate pre-treatment process.

 Objectives of Pretreatment
                   The main objective of textiles Pre-treatment is to produce a clean and absorbent cloth or to pass the textile materials by standard procedure; so that, it may brought to the state; which can be dyed or printed and finished without any hurdle and displaying any kind of faults.

1.     Complete removal of all kinds of Impurities

2.     Removal of all Projecting/Protruding fibers (Fibers hanging on fabric surface due to spinning of carded yarn)

3.     To get uniform absorbency(pick up) throughout the fabric
4.     To get maximum whiteness
5.     To have minimum damage of fibers constituting fabric.
6.     To neutralize pH of the fabric, necessary for further process.
7.     To remove Natural impurities (Fats, natural pigments, mineral substances and seed particles).
8.     To remove Artificial impurities (Sizes, mineral oils, fungus, rust and coloring materials)

   Pretreatment:
          The sequences of process starting from inspection of gray fabric to mercerization is called pretreatment.
   Objective of pretreatment:

  • ·        To get uniform absorbency(pick up) throughout the fabric
  • ·        To get maximum whiteness
  •       To remove Protruding or floating fibers (fibers hanging up on fiber surface)
  •       To remove all kind of impurities completely
  • ·        To have minimum damage to fabric
  • ·        To neutralize the pH of the fabric that is necessary for further process
  • ·        To make fabric ready for dyeing and printing.

Mechanics of materials by Beer Johnston

A helping book of Mechanics and machine mechanism and designing available now only my blog... download and continue learning. . .

Terms for garments and parts A-B


            1.         Accordian pleats
Narrow, straight pleats usually parallel to one another.

2.         Back-strap
Strap across the back of a garment at the waist, usually fitted with a buckle, or other method of adjustable fastening, and used to adjust the fit of the garment, within limits, to the wearer's requirement.

3.         Bearers (for trousers)
Sections fastened to the side seams to take the weight of the trousers when the fronts are opened.   Bearers for whole fall trousers contain the pockets.   Bilston bearers similar to whole falls but with deeper bearer.
Pocket bearers are employed for cross pockets.
French bearers are a continuation of the button catch & fly with two or more holes fastened on to a strap from the side seams.

4.         Belt loop
A loop of material or thread, which is sewn into the waist of the garment.   The degree of fit is adjustable by means of a belt drawn through the loops.

5.         Bespoke
Bespoke clothes are those which are made to the order of an individual.

6.         Bodice
The section of a woman's garment covering the body from neck to waist.

7.         Box pleat
A form of enclosed pleats achieved by double folding cloth alternately in opposite directions.

8.         Break
The point where the bridle ends at the centre front of a coat, it is usually at the top buttonhole.

9.         Buggy
A lining from the neck down across the back of anotherwise unlined coat.

10.       Button stand
The distance from the finished edge of the garment to the centre of the button.

The hole through which a button is passed to hold the garment in the correct position.

12.       Buttonhole stand
The distance from the finished edge of the garment to the eye of the buttonhole.

PARTS OF SINGLE NEEDLE LOCKSTITCH MACHINE


 Part name                                                        Function of the part
Bobbin                                                            holds the thread inside the machine

Bobbin case                                         holds the bobbin; allows the bobbin to turn and form the stitch; provides bobbin thread tension

Bobbin winder spindle                        holds the bobbin while it winds

Bobbin winder tension                        provides tension on the thread when the bobbin winds

Feed dog                                             moves the fabric along as you sew

Feed dog control knob                        lowers and raises the feed dog

Foot or knee control                            controls how fast the machine sews

Handwheel                                          controls the movement of the take-up lever and needle; can be controlled by power or by hand; always turn it toward you

Handwheel release                              stops needle movement during bobbin winding

Light switch                                        turns the light off and on

Needle                                                 carries the thread and pierces the fabric

Needle clamp                                      holds the needle in place

Needle plate                                        fits around the feed dogs; the needle goes through it; it has a seam guide on it

Needle position control knob              moves the needle to different positions: center, right, and left

Power switch                                      turns the sewing machine on or off

Presser foot                                         holds fabric in place while you sew

Presser foot lever                                lifts and lowers the presser foot

Reverse control                                   allows the machine to stitch backward

Spool pin                                             holds the spool of thread in place

Stitch-length control                           sets the length of the stitch

Stitch-pattern selector                         shows you which pattern the machine will sew

Stitch-width control                            sets the width of the zigzag stitch
(zigzag control)

Take-up lever                                      pulls thread from the spool

Thread cutter                                       a place to cut the thread(s) without using scissors

Thread guides                                     holds the thread in place on the sewing machine

Thread tension control                        adjusts tension on the thread as required for a particular project